With your SpecFlow installation comes SpecFlow.exe, a program that can be used to generate tests from the scenarios and create nicely formatted reports from the generated test results. There’s been a lot written about how to generate these reports when using NUnit (see this and this for example), but there’s been almost silence when it comes to managing this for MsTest. Facing this problem, I can see why… It’s a bit trickier.
In this blog post, I want to show you two things: how to generate MsTests from your .feature files and how to create a report from the generated results. Finally, I’ll show you how to put the two together and link it up to a nice “External tool” button in Visual Studio. Here we go:
Generate MsTests from your .feature file
With this step, you can generate the tests from your scenarios. SpecFlow.exe picks up your configuration and generates the test in your test framework of choice. Using the “help” command of SpecFlow.exe, “specflow help generateall” produces this help:
Generate tests from all feature files in a project usage: specflow generateall projectFile [/force] [/verbose] projectFile Visual Studio Project File containing features
I put together a .bat file that does this. (Note that I’m on a 64-bit machine and had to use some funky DOS shortcuts to get there. There’s no simple way to be architecture agnostic I’m afraid). Here is my file:
"%ProgramFiles(x86)%\TechTalk\SpecFlow\SpecFlow.exe" generateAll Specs\Specs.csproj /force /verbose

pause
I’ve added some line breaks for readability.
Well – that was easy.
Create a report from the generated results
To get this step to work, we have to run the tests and get hold of the location of the test report file (.trx). When you do this from within Visual Studio, the test reporting is done in a TestResult folder, and the file gets a name with a timestamp. That is not very script-friendly, sadly, so we’re forced into writing a .bat file that also runs the tests.
I used the MsTest Command line reference to put together this .bat file:
if Exist TestResult.trx del TestResult.trx

"%ProgramFiles(x86)%\Microsoft Visual Studio 10.0\Common7\IDE\mstest.exe" /testcontainer:Specs\bin\Debug\Specs.dll /resultsfile:TestResult.trx

pause
Again, watch out for using a 64-bit Windows and use %programfiles% if you’re not.
Some strangeness with MsTest made me delete the testResults.trx before each run. Also, MsTest creates some folders (username_testrun…), but that doesn’t bother me now.
When we have a created .trx file, we can run the command that creates the report for us. According to the “documentation” (specflow help mstestexecutionreport):
usage: specflow mstestexecutionreport projectFile [/testResult:value] [/xsltFile:value] [/out:value]
- The projectFile is the Visual Studio Project File containing features and specifications.
- Test Result refers to the .trx file generated by MsTest, and it defaults to TestResult.trx.
- Xslt file to use, defaults to the built-in stylesheet if not provided.
- out is the generated output file. Defaults to TestResult.html.
I’m happy with the defaults of the last three since I choose my .trx-file name wisely. So my whole .bat file becomes this:
"%ProgramFiles(x86)%\TechTalk\SpecFlow\SpecFlow.exe" mstestexecutionreport Specs\Specs.csproj

pause
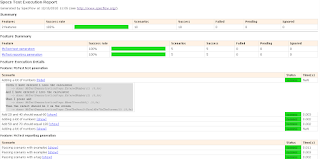
Lo and behold; it actually produces the nice report we wanted:

Putting it all together
That’s neat – we now have three different .bat files that we need to click in consecutive order ;) No really – the first one (generate test from features) can most certainly be handled by Visual Studio in most cases. Or in any case will probably not run in conjunction with the other two steps. But to run the tests and produce a report would be nice with a single file. Here it is:
if Exist TestResult.trx del TestResult.trx

"%ProgramFiles(x86)%\Microsoft Visual Studio 10.0\Common7\IDE\mstest.exe" /testcontainer:Specs\bin\Debug\Specs.dll /resultsfile:TestResult.trx

"%ProgramFiles(x86)%\TechTalk\SpecFlow\SpecFlow.exe" mstestexecutionreport Specs\Specs.csproj /testResult:TestResult.trx

pause
And looking at this blog post, I’ve also created a parameterized version of it that I can hook up to an “external command” that does that with a single click. That changes the .bat file into this:
if Exist TestResult.trx del TestResult.trx

"%ProgramFiles(x86)%\Microsoft Visual Studio 10.0\Common7\IDE\mstest.exe" /testcontainer:%2 /resultsfile:TestResult.trx

"%ProgramFiles(x86)%\TechTalk\SpecFlow\SpecFlow.exe" mstestexecutionreport %1 /testResult:TestResult.trx /out:TestResult.html

echo Created file TestResult.html
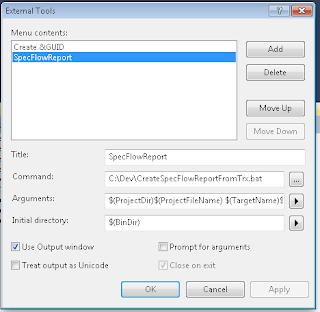
So you need to send the name of the test container (the .dll) and the project file. Save that file to a known location so that you can point your external command to it. Finally, you can create an external tool button in Visual Studio and set the parameters as follows:

The arguments to the external command are:
$(ProjectDir)$(ProjectFileName)$(TargetName)$(TargetExt)
Note that the project with specifications has to be selected before the External command can be run.
Conclusion
In this blog post, I’ve learned how to hook up SpecFlow to generate tests and reports for me. You can download my code here.